

Shopping Cart



How to Replace the Resin Bezel and Strap on Your Casio G-SHOCK
Master the art of G-SHOCK maintenance. Learn how to easily replace the resin bezel and strap to restore your watch's rugged armor, combat hydrolysis, or customize its aesthetic.

Key Takeaways
- Modular Architecture: G-SHOCK watches utilize a unique protective structure, allowing the outer resin bezel to be replaced without exposing the internal timekeeping module.
- Combating Hydrolysis: Polyurethane resin naturally degrades over time due to moisture and UV exposure, making bezel and strap replacement a necessary maintenance skill for long-term ownership.
- Precision Tools: Successfully swapping parts requires specific tools, most notably a JIS (Japanese Industrial Standard) screwdriver, to prevent stripping the delicate bezel screws.
- Customization Potential: Swapping resin parts is the foundation of the thriving G-SHOCK modding community, allowing owners to completely transform the look of popular models like the GA-2100 series.
Since its inception in 1983, the horological landscape has been permanently altered by the introduction of a watch designed to be virtually indestructible. The philosophy behind these rugged timepieces was simple: create a watch that could withstand a ten-meter drop, survive ten atmospheres of water pressure, and boast a ten-year battery life. While the internal electronic modules and the robust inner cases have consistently lived up to this "Triple 10" mandate, the external armor—the flexible, shock-absorbing outer shell—is inherently designed to take the brunt of physical trauma. Over years of hard use, exposure to the elements, and the inevitable passage of time, this outer layer bears the scars of its service.
For many watch enthusiasts, a battered exterior is a badge of honor, a testament to adventures had and environments conquered. However, there comes a point when the degradation of the external materials compromises not just the aesthetic appeal, but the structural integrity of the watch's shock-absorption system. Fortunately, the genius of this design lies in its modularity. The outer shell is not a permanent fixture but a replaceable shield. This brilliant engineering choice empowers owners to perform their own maintenance, breathing new life into a trusted companion without the need for expensive factory servicing.
Replacing the external components of your rugged timepiece is a deeply satisfying process that connects you more intimately with the mechanics of your watch. Whether you are restoring a vintage piece suffering from material breakdown, refreshing a daily beater that has seen too many impacts, or diving into the vibrant world of aftermarket customization, mastering this simple procedure is an essential skill. This comprehensive guide will walk you through the technical nuances, the necessary tools, and the step-by-step methodology required to successfully replace the external armor and strap of your timepiece, ensuring it remains ready for whatever challenges lie ahead.
The Anatomy of G-SHOCK’s Modular Armor
To understand why replacing the external components is both possible and safe, one must first understand the revolutionary Hollow Core Guard Structure. When engineer Kikuo Ibe first conceptualized the ultimate tough watch, he realized that simply encasing a standard watch module in thick rubber was insufficient; the shock would still transfer to the delicate quartz oscillator. As detailed by G-Central, the premier source for brand news, the solution was to float the module within the inner case, supporting it only at a few critical points.
This inner case—often made of stainless steel, titanium, or carbon-reinforced resin—is the true waterproof and dustproof housing of the watch. The outer layer, commonly referred to as the bezel, is entirely separate. It is a meticulously engineered piece of polyurethane resin designed to act as a bumper. It protrudes past the crystal to prevent direct impacts to the glass and shields the buttons from lateral shocks. Because this bezel is merely a protective shroud, removing it does not break the water-resistant seal of the inner case.
This separation of the protective bumper from the sealed inner case is what makes DIY replacement so accessible. You are not opening the watch; you are simply changing its clothes. This modularity is a hallmark of the brand's design language, extending from the original square models to the complex, multi-layered cases of the modern G-Shock PRO collection. Understanding this architecture gives you the confidence to manipulate the external screws and stretch the resin without fear of damaging the precision electronics housed safely within.
Recognizing When It Is Time for a Replacement
The most common reason for replacing the external components is a chemical process known as polyurethane hydrolysis. Often referred to colloquially in the watch community as "resin rot," this is the inevitable breakdown of the polymer chains within the urethane material. According to materials science principles, prolonged exposure to moisture (including sweat), ultraviolet light, and extreme temperature fluctuations causes the plasticizers in the resin to evaporate. The material transitions from being flexible and resilient to becoming brittle, sticky, or chalky. Eventually, a bezel suffering from severe hydrolysis will simply crumble and crack under minimal pressure.
Beyond chemical degradation, physical trauma is a primary catalyst for replacement. Deep gouges, torn strap holes, or a stretched bezel that no longer sits flush against the inner case can compromise the watch's ability to absorb shocks effectively. If the bezel is loose, dirt and grit can accumulate between the resin and the inner case, acting as an abrasive that can slowly wear away at the water-resistant seals over time.
Finally, the desire for aesthetic customization is a massive driver for component replacement. The modular nature of these watches has birthed a massive modding community. Owners frequently swap out standard black bezels for vibrant colors, transparent "jelly" resins, or even aftermarket metal conversion kits. For instance, transforming the stealthy Casio G-SHOCK Classic GA-2100-1A1ER Watch with a brightly colored summer strap and bezel is a popular way to refresh the watch's look without buying an entirely new timepiece.
Essential Tools for the Operation
While the process is straightforward, using the correct tools is non-negotiable. The most critical, yet frequently overlooked, tool is a JIS (Japanese Industrial Standard) screwdriver. The small screws securing the bezel to the case may look like standard Phillips head screws, but they are not. As noted by technical experts at Fratello Watches, Phillips screws are designed to "cam out" (slip out of the screw head) when a certain torque is reached to prevent overtightening. JIS screws, however, are designed for maximum grip and torque without camming out.
Using a standard Phillips screwdriver on a JIS screw is the leading cause of stripped screw heads in watch maintenance. A stripped bezel screw embedded in a resin or carbon case is a nightmare to extract and can permanently ruin the watch case. Investing in a high-quality precision JIS screwdriver set (specifically sizes #00 and #000) is essential for anyone looking to maintain Japanese timepieces.
In addition to the correct screwdriver, you will need a standard spring bar tool with a fine forked end for removing the strap. Tweezers can be helpful for handling the tiny screws, and a soft microfiber cloth will protect the crystal when the watch is placed face down. Finally, having an old, soft-bristled toothbrush and some mild soapy water on hand is highly recommended, as removing the bezel will reveal years of accumulated dust and grime that should be cleaned before the new components are installed.
Step-by-Step Guide to Removing the Resin Bezel
Before beginning, ensure you are working in a well-lit, clean area. Place your watch face down on the microfiber cloth. The first step is to identify the correct screws. You are looking for the screws located on the sides of the watch case that secure the outer resin shell. Do not touch the four screws on the metal case back; removing those will open the inner module and compromise the water resistance rating.
Using your JIS screwdriver, apply firm downward pressure while slowly turning counter-clockwise. The goal is to break the initial friction without letting the driver slip. Once the screws are loose, remove them carefully and place them in a secure container. Depending on the model, there are typically four bezel screws, though larger models like those in the Master of G series may have more complex arrangements or decorative screws that also need removal.
With the screws removed, the bezel is held in place only by its molded shape, which wraps tightly around the inner case and the protruding buttons. To remove it, gently stretch the resin outward from one of the corners, pulling it up and over the buttons. It is usually easiest to start on the side with fewer buttons. If the resin is old and brittle, it may crack during this process—this is fine if you are replacing it, but be cautious of sharp edges. Work your way around the case until the bezel pops free.
Cleaning the Inner Case
Once the bezel is off, you will likely be confronted with a surprising amount of dirt, dead skin cells, and grime packed into the crevices of the inner case. This is entirely normal. Take this opportunity to thoroughly clean the inner case using the soft toothbrush and a tiny amount of mild soapy water. Be gentle around the button pushers and the crystal gasket. Dry the case completely with a lint-free cloth before proceeding to the next steps.
Detaching and Replacing the Strap
With the bezel removed, accessing the strap is significantly easier, as the resin shroud no longer obstructs the lugs. Most models utilize standard, albeit thick, flanged spring bars to secure the strap to the inner case. Insert the forked end of your spring bar tool between the inner lug of the watch case and the edge of the strap. Catch the flange of the spring bar and apply pressure inward, toward the center of the strap, to compress the spring.
While keeping the spring compressed, gently push the strap downward and away from the watch case. The spring bar should pop out of the lug hole. Repeat this process for the other side. When removing the strap from older watches, the resin may have stiffened considerably, requiring a bit of wiggling to free it from the lugs. Once removed, extract the spring bars from the old strap; you will need to reuse them if your new strap did not come with replacements.
To install the new strap, insert the spring bars into the top holes of the new resin bands. Place one end of the spring bar into the lug hole on the watch case. Use your spring bar tool to compress the other end of the spring bar, slide the strap into position between the lugs, and release the tension. You should hear a distinct "click" as the spring bar snaps into the lug hole. Give the strap a firm tug to ensure it is securely seated; a loose spring bar will result in the watch falling off your wrist.
Dealing with Stubborn Spring Bars
Occasionally, spring bars can become fused to the inside of the strap due to sweat and dirt, or they may be bent from a heavy impact. If a spring bar refuses to compress, do not force it, as you risk gouging the watch case. Apply a tiny drop of penetrating oil or silicone spray to the ends of the spring bar and let it sit for a few minutes. If it remains stuck, you may need to carefully cut the old strap away with a craft knife to access the center of the spring bar and cut it with heavy-duty wire snips, replacing it entirely with a new one.
Installing the New Bezel and Final Assembly
Installing the new bezel is essentially the reverse of the removal process, but it requires a bit of finesse. The new polyurethane will be stiff and tight. Begin by aligning the bezel over the watch face. Hook one side of the bezel over the buttons on one side of the case. Once that side is seated, you will need to stretch the resin over the buttons on the opposite side.
Do not use metal tools to pry the bezel over the buttons, as this can easily scratch the inner case or damage the pushers. Use your thumbs to firmly stretch and push the resin into place. It requires a surprising amount of force, but the material is designed to stretch. Ensure that the bezel is sitting completely flush against the inner case all the way around, and that the button cutouts are perfectly aligned with the pushers.
Once the bezel is seated, it is time to reinstall the screws. Insert the screws into their respective holes. Using your JIS screwdriver, turn the screw counter-clockwise until you feel a slight click; this indicates that the threads of the screw have aligned with the threads in the case, preventing cross-threading. Then, tighten the screw clockwise. Do not overtighten. The screws only need to be finger-tight. Overtightening will strip the threads in the resin or carbon case, rendering the screw hole useless.
Customization and Upgrading Your Collection
The ability to easily swap external components has elevated these watches from mere utilitarian tools to highly personalized accessories. The process described above applies to almost the entire G-Shock collection, allowing for endless creativity. For example, the high-gloss finish of the Casio G-SHOCK Classic GA-110GB-1AER Watch can be swapped for a matte black bezel from the Casio G-SHOCK Classic GA-110-1BER Watch to create a stealthier, more subdued aesthetic.
The modding scene has exploded in recent years, particularly around the octagonal "CasiOak" models. Enthusiasts frequently purchase base models like the Casio G-SHOCK Classic GA-2100-1AER Watch and swap the factory black resin for vibrant aftermarket options, or even stainless steel conversion kits that mimic the look of luxury sports watches. If you prefer factory-original bold colors, models like the Casio G-SHOCK Classic GA-2100-4AER Watch offer striking red resin right out of the box, which can later be swapped for black when a more conservative look is required.
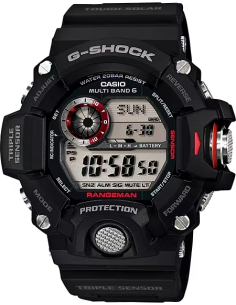
For those who rely on their watches in extreme environments, maintaining the integrity of the resin is a matter of functional necessity. The Casio G-SHOCK Rangeman GW-9400-1ER Watch, a staple of the Master of G line, features a complex, multi-piece bezel designed to protect its Triple Sensor technology. Replacing the armor on a Rangeman ensures that its altimeter, barometer, and compass remain shielded from devastating impacts during serious outdoor expeditions.
The Evolution of G-SHOCK Materials: From Urethane to Carbon Core
While traditional polyurethane remains the standard for most replacement bezels and straps, it is worth noting how the underlying architecture has evolved, which impacts how you interact with the watch during maintenance. Historically, the inner case was made of stainless steel or a dense resin. However, modern iterations, particularly the GA-2000 and GA-2100 series, utilize the Carbon Core Guard structure.
According to horological analysts at Hodinkee, this structure integrates carbon fiber into the resin of the inner case, resulting in a module housing that is lighter, thinner, and significantly more rigid than previous generations. When replacing the bezel on a Carbon Core Guard watch, you will notice that the inner case feels different—harder and less forgiving. This makes the use of the correct JIS screwdriver even more critical, as stripping a thread in a carbon-reinforced case is much more difficult to repair than in a standard resin case.
Furthermore, the evolution of strap attachments has made maintenance easier on newer models. Many modern straps now feature quick-release spring bars. These bars have a small protruding lever that allows you to compress the spring with your fingernail, entirely eliminating the need for a spring bar tool. When upgrading or replacing straps on newer models, checking for this quick-release feature can save you significant time and effort.
Conclusion: Refresh, Rebuild, or Expand Your Rotation
Replacing the resin bezel and strap on your timepiece is a rite of passage for any serious enthusiast. It is a practical skill that extends the lifespan of your watch indefinitely, combating the natural degradation of materials and erasing the scars of hard use. More than just maintenance, it is an avenue for personal expression, allowing you to tailor the aesthetic of your watch to your specific tastes or the demands of your environment.
By understanding the modular architecture, utilizing the correct precision tools, and following a careful, step-by-step approach, you can safely and effectively rebuild your watch's armor. Whether you are restoring a vintage classic, customizing a modern CasiOak, or ensuring your Casio G-SHOCK Rangeman GW-9400-1ER Watch is ready for its next expedition, the power to refresh your timepiece lies in your hands.
If your current watch has seen better days and a simple resin swap isn't enough, or if you are looking for a new base model to begin your customization journey, we invite you to explore the extensive Casio collection at WatchExclusive. From rugged tactical models to sleek, modern classics, find the perfect foundation for your next horological project today.
References
- G-Central. "The History and Evolution of the Hollow Core Guard Structure." G-Central G-Shock Watch Fan Blog.
- Fratello Watches. "Why You Need a JIS Screwdriver for Japanese Watches." Fratello Magazine.
- Hodinkee. "Understanding the Carbon Core Guard: The Next Generation of Toughness." Hodinkee Horology Report.

About the author
F. Nagy


